|
I have been chasing a ticking noise for a while. I finally determeined it was coming from deep in cylinder 3 by pulling the spark plug wire while the engine was running and finding that the ticking went away. At that point there was nothing left to do but pull the engine, tear it down, and figure out the problem.
I took the block, piston, crank, et al to the a machine shop for their diagnosis. They measured the cylinders and the #3 cylinder was wider in the middle that the top and bottom. This was allowing the piston skirt to slap the walls. They said this was down to shoddy work by the the machine shop who originally did the work, in this case Ridge Reamer down in Arvada.
The solution was to get new larger pistons and machine the cylinders to match. You would not believe the odysey this became. The pistons had to be custom made by Wiseco. Of course the head gaskets also had to be custom made for that size, which was handled by Cometic.
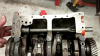
During the tear down I found the balance shaft bearings had some wear. Since that was what caused me to rebuild the motor the first time, I opted to replace them. While replacing them, I opted to replace the cam bearings at the same time as a matter of course. And I am glad I did, I found some weird wear marks on the inner cam bearing.
I actually planned to reuse the crank bearings because they looked great. Somewhere along the way back and forth to the machine shop, the bearings got lost. It took me a LONG time to find another set of crank bearings in the correct size (.010). Once in hand, I finally learned how to use plastigauge to measure the clearance to make sure the bearings would work. Thankfully everything was in spec.
But I had a different problem. Once the crank bearing caps were torqued down, the crank wouldn't turn by hand. If the cap bolts were only hand tight, the crank turned without issue. How frustrating. To my credit, before grabbing a hammer or doing something stupid, I took the motor to Mile High Crankshafts in Denver for their diagnosis. Quick side note, that shop is a gem and the ower is extremely helpful and nice guy. Turns out, Ridge Reamer outsources crank grinding to Mile High, which means he was the one that ground the crank originally to accept the 0.010 oversized (more accurately undersized) crank bearings.
He ended up tearing everything down, measure, re-measuring, and verifying that the crank was not bent. Finally he solved it. I had two bearing caps mixed up. One cap has a chamfered edge to accomodate the center crank bearing with integrated thrust bearings on the sides. I had an end cap on the center and without that chamfered edge, it was putting pressure on the far edges of the bearing and squeezing it tight to the crank. I should have realized this when I plastigauged the bearings and found the clearance was tighter toward the ouside. Duh. Its so obvious now that it was user error.
In my defense, the numbers on the bearing caps are really worn down but are numbers 2, 3, and 4. There is no 1, probably because it got cut off when Ford took a V6 and make it a V4. I had put 3 on the outside, not realizing that my #4 was actually a #1 even though it was so worn it was not legible. Lesson learned. At least I didn't make things worse and instead went to a pro. With the crank turning freely, I could get back to the rest of the reassembly...
End of crank rant>
I installed new balance shaft bearings and was very sad to see that the balance shaft was very hard to turn once installed. I double and tripple checked that the bearings were straight which they were. Ultimately I had to use some sand paper on my bearing installer tool to take a tiny amount off the I.D. of both bearings. Now the balance shaft bearing turns easily by hand like it should.
Another gotcha with reassembling the motor is the gaskets. The gaskets aren't super precise. In some cases, these metal lined gasket stick out slightly and need to be cut down or bent over. A good example is intake manifold gasket, which stick out slightly onto the valve cover sealing surface. The gasket has metal in the middle, so the only way to ensure you don't end up with oil leaking out the valve cover is to tap the gasket sitting proud with a mallet to get it to sit flat. Another example is the intake manifold gasket to the heads. My heads have enlarged intake ports. The gasket therefore blocks a portion of the enlarged intake port. I had to use a dremel grinder to cut the gasket back. Ugh. That's annoying but it comes with making engine modifications.
The final issue I ran into was one I never experience with any of my prior rebuilds on this motor: The engine was leaking oil out the balance shaft pully. It wasn't "leaking" per se. Instead, it was releasing a fine mist of oil. After some troubleshooting with the engine running, I figured out that oil was escaping between the pully and the woodruff key'ed shaft it sits on. That's wild. I removed the pully, put some sealing compound on the pully and the shaft, reinstalled, let it sit for the 24 hour cure time, started it up and no more leak. I have never seen oil coming out that spot before. The manual makes no mention of sealing there. And yet I see no reason oil wouldn't leak there since its exposed to the full oil pressure that the balance shaft bearing is getting. The probably isn't an issue when you are running 30 psi of oil pressure stock. I have a high pressure oil pump in there that runs about 65 psi when at tempareture (75 psi when cold). I guess that makes the diffference. Anyways, at the cost of having to drain the cooling system and remove the radiator again, the pully is sealed now and the leak is gone.
Movies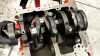
aligned crank in bearings.mp4 (69.6MB)
sanded balance shaft bearings.mp4 (27.3MB)
Pictures
Preview Image Size
| | | | | | | | | | | | | | | | | | | | | | | | | | | | | This is bad, due to using the wrong bearing cap. Missing this clue cost me some time later | | | | | | | | | | | went ahead and replaced the camshaft bearings | | | | | | look at the weird wear mark on the center cam bearing. Glad I replaced them | | | | | | The all important head oil gallies are lined up correctly in the bearing | | | | | | | | | | | | Didn't know it yet, but I have the left and middle bearing caps mixed up | | | | | | | won't turn by hand, checking front to back free play | | | | | | chamfered edge of center bearing is obvious. These caps are not identical | | | | | | | now with correct center cap installed, used feeler gauge to get equal gap to bearing on both sides | | | | | used a hammer to pry crank to get equal gap to center bearing vertical sides | | | | | | | | | | | | | | | | | | The instructions from Wiseco were not too helpful | | | | | Thankfully the saab shop manual is clear that chrome ring is on top, lower ring has ridge down | | | | | | | | | | | The machine shop filed all my rings for me. Great, one less thing for me to worry about | | | | | Unfortunately, I ended up with two bags of rings labeled #1. Looks like I have to measure after all | | | | | Need to figure out which set of rings is actually for cylinder #1 and which is for #3 | | | | | measured, determined they used gap for high perf street/strip. Now I know | | | | | | | | | Custom wiseco pistons, spec sheet is a later picture | | | | | VERY IMPORTANT, rod oil holes should squirt AWAY from dip stick when viewed from bottom. | | | | | | | | | | | | | balance shaft won't turn easily by hand. Had to remove and sand bearings slightly | | | | | | | | | | | | | | | | | | gasket sits proud and would cause oil leak | | | | | | | | | metal shavings, but from what? No idea, distributor looks great | | | | | cleaned up old metal shavings | | | | | | | | | | | | | | | | | | | | | | | | custom head gaskets with bore to match custom wiseco pistons | | | | | | | | | | | | removed carbon from heads. Thats all the heads needed | | | | | | | | | | | | | This gasket always sits like crap | | | | | trim the head gasket as best you can, then cut the cork as needed | | | | | | | my intake runners are bored out, hence gasket needs to get bored out too | | | | | boring this gasket is rough because its metal lined. Not pretty, but it works | | | | | | | | | | intake manifold gasket sits proud and would cause valve cover gasket oil leak | | | | | hammer down the metal lined gasket to eliminate future oil leak | | | | | | NOTE, had to come back later and put sealing on pully and shaft due to oil leak | | | | | | | | | | | | | might as well replace the spark plugs while everything is easily accessible | | | | | | | lost locating pin last time. Replaced weak plastic hack with brass pin | | | | | | | | | NOTE, had to shorten hoses because throttle hits this later | | | | | | | | | I thought it sat flush, but I can't get it any further back than that with 2 engine supports bolts i | | | | | | | running break in oil for the initial break in and the first couple hundred miles | | | | | running oil pump with drill, oil getting to heads like it should | | | | | | coolant line sitting too far out, throttle hits it | | | | | | shortened up the hoses slightly, now the throttle linkage clears | | | | | starting to look like a real engine again | | | | | old throttle linkage, I busted one of the plastic ball joints... again | | | | | | got a universal throttle linkage, Jeggs 15796. Worked great | | | | | | can be adjusted to the length needed for the Sonett | | | | | | new linkage installed, works perfect | | | | | | | | adjusted clutch release arm slack. With the new clutch, room for adjustment still which is great | | | | | | | yeah yeah, adjusted belt tension to spec too | | | | | | | | almost forgot to reinstall the breather valve | | | | | put a little thread sealant on it | | | | | | pro tip, run the car up to 50 mph on jack stands with 1 axle out = grease thrown everywhere | | | | | during break in I can see a minor oil leak, but where is it coming from | | | | | its a fine oil mist coming from the inner part of the balance shaft pully | | | | | you can see the oil pooled up in the pulley | | | | | has to drain the cooling system and remove the radiator to get the pully out | | | | | | oil leaking out in between the pulley and the shaft it sits on | | | | | added some sealing compound | | | | | | also added sealing compound to the pulley bolt washer just in case | | | | | dont forget red thread locker on the threads | | | | | otherwise manaully turning over engine can easily loosen bolt instead | | | | | | everything back together and ready for a test drive | | | | | | test drive successful. Minor coolant leak to take care of but nothing to serious | | | | | the specs for the custom made cometic head gaskets. These worked well and are reasonably priced | | |